Acrylonitrile Butadiene Styrene (ABS) is favored for many 3D printing projects because of its strength, flexibility, and ease of use. However, a common issue with ABS is the noticeable layer lines it produces, which can affect the overall aesthetic of the prints. Luckily, acetone smoothing provides a practical way to address this, improving both the look and texture of ABS prints. This guide will lead you through the ABS acetone smoothing process, helping you to achieve high-quality results in a safe and effective manner.
Table of Contents
- 1 What Is ABS Acetone Smoothing?
- 2 Reasons for Acetone Smoothing Your ABS Prints
- 3 Step-by-Step Guide to ABS Acetone Smoothing
- 4 Start ABS Acetone Smoothing
- 5 Brief Guide to Safety Precautions During the ABS Acetone Smoothing Process
- 6 Best ABS Acetone Smoothing Service Provider – TEAM Rapid Tooling
- 7 Tips for ABS Acetone Smoothing
- 8 Conclusion
What Is ABS Acetone Smoothing?
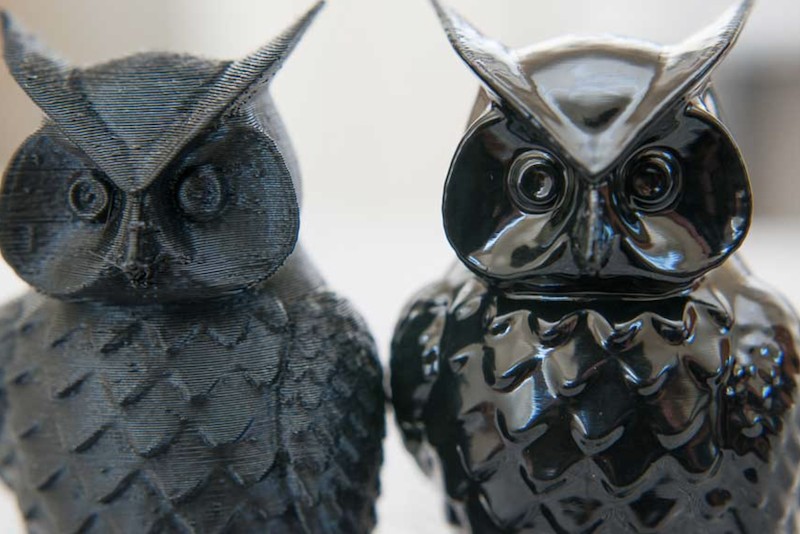
ABS acetone smoothing is a post-processing technique for ABS 3D printing filament that eliminates layer lines by dissolving them with acetone. This technique involves placing unprocessed ABS plastic prints in acetone vapors, which causes the layers to merge. This leads to a smooth and shiny surface without any visible lines.
What Is Acetone?
Acetone is a clear organic liquid highly valued for its effectiveness and versatility as a solvent. Due to its chemical structure that integrates both polar and nonpolar characteristics, it owns dual-solvent capability, which makes it possible to dissolve both polar and nonpolar materials. Consequently, acetone is effective with various organic and inorganic materials. Additionally, acetone can mix fully with water, facilitating the dissolution of different chemicals across various environments. Despite being organic, acetone is non-toxic, which contributes to its widespread application in many areas.
The Interaction Between Acetone and ABS Plastic
ABS is a thermoplastic polymer created by polymerizing styrene and acrylonitrile with polybutadiene. Like other polymers, ABS resists some substances while being vulnerable to others. When acetone interacts with ABS plastic, it can dissolve in several substances, such as esters, chloroform, ethylene dichloride, and specific ketones like acetone. Chloroform and ethylene dichloride are hazardous and demand strict safety measures, whereas acetone is safer for casual use. Acetone dissolves ABS since the polymer is soluble in ketones, creating a surface slurry when used on 3D-printed ABS components. This interaction is widely used in post-processing to enhance the aesthetic appeal of ABS prints, making them suitable for professional and decorative applications.
Reasons for Acetone Smoothing Your ABS Prints
Acetone smoothing offers an affordable method to improve the visual appeal and durability of ABS prints, making it a valuable technique for both enthusiasts and professionals. Here are 3 key reasons for using acetone to smooth ABS prints.
Create a Glossy Surface Finish
Smoothing ABS parts helps effectively remove visible layer lines and converts the surface from a matte to a glossy texture. By applying acetone, the ABS material nearly dissolves, which causes the layers to blend together, giving a sleek and polished sheen. The result is a 3D print featuring a smooth, glossy, and professional-looking surface finish.
Glossy finishes are especially attractive for certain prints like models, busts, figures, and decorative items. Moreover, if the filament is already the desired color, further painting is unnecessary. The improved appearance of glossy parts also enhances their versatility, making 3D-printed ABS parts ideal for a wide range of uses.

Eliminating Layer Lines and Imperfections
Certain 3D printing methods can leave noticeable layer lines on parts due to layer-by-layer construction along the Z-axis. These lines are more pronounced with larger layers and curved shapes. Acetone is crucial in the smoothing process. When acetone is applied to an ABS printed surface, it causes the plastic to dissolve slightly. This action enables the layers to merge, filling any gaps and forming a smooth, continuous surface. The outcome is a finish that looks much like an injection-molded product, free of visible layer lines.
Enhance the Strength of ABS Parts
Acetone vapor smoothing enhances the strength of ABS 3D printed parts by removing layer lines and tiny gaps, thereby reducing stress points and potential weak areas caused by layer adhesion problems. FDM prints typically show anisotropic mechanical properties, meaning their strength changes depending on the direction of the load, a common issue in FDM 3D printing. This process enhances the bonds along the z-axis, making parts more robust against z-axis stresses. It’s crucial to note that exposure to acetone temporarily softens the outer layers of the print, and it may take several weeks for them to fully harden again.
Step-by-Step Guide to ABS Acetone Smoothing
Preparation: Materials and Equipment Needed
If you’re committed to using acetone for smoothing your 3D prints, you can conveniently utilize common household items. Before that, have a look at the list of what you may need:
Acetone Varieties
It is the primary solvent used for smoothing ABS prints. For effective ABS smoothing, you should adopt high-purity acetone (at least 99% purity) to ensure it is free from impurities, water, and contaminants. Impurities or moisture in the solvent may lead to uneven results, potentially affecting the smoothing process and the quality of your ABS prints.
Safety Gear
Since acetone is a highly flammable solvent that can pose health risks if inhaled in large quantities, before starting, it’s crucial to prioritize safety. Here’s a recommended list of safety gears for ABS acetone smoothing:
| Safety Glasses or Goggles | Wear safety glasses or goggles with side shields to protect yourself from splashes or fumes. |
| Respirator Mask with an Appropriate Filter | To avoid inhaling acetone vapors, especially in areas with poor ventilation, wear a respirator or mask equipped with organic vapor cartridges, ensuring it effectively filters chemical fumes. |
| Chemical-Resistant Gloves | Choose gloves crafted from materials such as nitrile or neoprene to shield your hands from acetone exposure, as these materials resist chemical penetration. |
| Protective Clothing | Wear long sleeves to reduce skin contact with acetone, preventing accidental exposure. |
| Fume Hood | Conduct smoothing in a well-ventilated area or a fume hood to disperse acetone vapors, minimizing inhalation risks. |
| Fire Extinguisher | Keep a fire extinguisher close at hand since acetone is highly flammable, enabling swift and safe action in case of a fire. |
| Emergency Equipment | Know the locations of safety showers and eye wash stations for emergency use if accidental acetone exposure occurs. |
Brushes, Containers, and Other Tools
During the ABS acetone smoothing process, there are several essential tools you need to ensure a smooth and effective finish. Let’s have a look!
| Transparent Container | Select a container that accommodates the size of your 3D-printed piece. A transparent material makes it easier to monitor the smoothing process. Ensure it has a tightly sealed lid to effectively contain the acetone vapor. |
| Brush | You’ll need a brush to evenly apply acetone to the surface of your ABS print. It functions in spreading the solvent uniformly for consistent smoothing. |
| Aluminum Foil | Aluminum foil is commonly used at the bottom of the container to stop the ABS part from adhering to the base, as acetone does not dissolve metals. |
| Paper Towels | To aid in vaporization, you’ll need to soak paper towels in acetone. Any absorbent paper towels or tissues will be suitable for this task. |
Start ABS Acetone Smoothing
Step 1: Prepare the ABS Part for Smoothing
Begin with an ABS printed piece that is both clean and dry. Now, you can use specific plastic cleanup files, such as flat or half-round files, to smooth the surface. This step helps eliminate rough spots and layers that acetone alone smooth out. Ensure you use files that haven’t been used on other materials to prevent foreign particles from damaging the finish. The filing process should be efficient and doesn’t require covering the entire piece. Omitting this step might result in uneven spots on your print.
Step 2: Apply Acetone
Method 1: Brushing
If you’re looking for the easiest way to achieve a relatively smooth finish on ABS parts, then using a brush to apply liquid acetone is possible. This method gives you control over the smoothing level and application. For small details, you should choose a fine-tipped brush while for larger areas, you should choose a flat brush.
- Begin by adding a small quantity of liquid acetone into a shallow container.
- Dip the brush tip into the acetone and gently spread it over the 3D-printed surface.
- Keep going until you achieve the smoothness and look you want.
- Allow the parts to dry before use.
Brushing with acetone is effective for smoothing models with intricate details, offering precision and reducing the risk of damage. Compared to other methods, it also takes less time.
Note:
- It uses a considerable amount of acetone and may lead to uneven smoothing, causing streaks or irregular surfaces.
- Using excessive solvent might permanently warp or dissolve the thin walls of the part.
Method 2: Acetone Vapor Bath
An acetone vapor bath is a highly effective method for smoothing ABS without directly applying liquid acetone. It uses acetone fumes to gently smooth the surface of the part. Here’s a detailed guide for vapor smoothing ABS:
Set Up the Smoothing Box
Use a suitable container that is partially enclosed but not airtight. For example, a glass jar works well for small parts, while a transparent polypropylene (PP) container works better for larger parts or multiple items.
Prepare the Raised Platform
The raised platform is often placed inside the container. Please ensure that this platform is made from a material that won’t dissolve in acetone, such as a metal plate covered with aluminum foil. This will prevent the ABS parts from touching the bottom of the container.
Use Acetone-Soaked Paper Towels
Dampen paper towels with acetone and position them along the inner edges of the smoothing box. Secure them by pressing against the container walls or use magnets, placing one inside and one outside the box, to hold them in place.
Manage the Vapor Smoothing Process
Gently place the lid on the container without sealing it completely. Create a few small holes in the lid for ventilation to avoid any hazardous pressure buildup.
Keep an eye on the process through the clear container to ensure you reach the desired level of smoothness. This can take anywhere from 10 minutes to an hour
Step 3: Monitor and Control the Acetone Smoothing Process
The acetone smoothing process, particularly using the vapor bath method, requires careful monitoring and control to achieve optimal results. Here is a systematic guide to help you effectively manage the acetone smoothing process.
Set a Timer
First, set a timer to manage the duration of exposure to acetone fumes, which helps in maintaining consistency across different smoothing sessions. The required time can vary significantly, usually ranging from 10 minutes to 2 hours. This depends on your model size, the space within the smoothing box, and the amount of acetone used.
Determine Appropriate Duration
- How to determine the suitable duration? Here are some tips:
- Model Size: Larger models might require more time to ensure that all areas are evenly smoothed.
- Acetone Amount: The amount soaked into the tissues influences how quickly the fumes permeate the part.
- Experience: As you gain experience, you’ll better estimate the necessary duration.
Regularly Check Progress
To avoid over-smoothing, check the part’s progress every few minutes, which is simpler with a transparent box.You might add a mild heat source to accelerate the smoothing process or a small fan to help distribute the fumes evenly within the box, but be cautious with electronics to avoid fire risks.
Step 4: Conclude the Process Perfectly
After achieving the desired smoothness, conclude the process with these steps for the vapor bath method:
Ensure Proper Ventilation
Before carefully removing the container, ensure you are in a well-ventilated space. This step is crucial to effectively prevent any contact between the paper towels and the 3D-printed part, safely manage the release of acetone fumes and prevent any health hazards.
Handle the Part with Care
Refrain from touching the part once it is out of the container. At this stage, the part is still in a semi-liquid state, and any contact can lead to distortion or unwanted fingerprints on its surface.
Allow the Part to Dry
Place the part/ craft in a secluded area to dry out, which will allow any excess acetone to evaporate. The drying period, which allows the part to regain rigidity, can vary from a few hours to several days, depending on environmental conditions and the part’s specifics.
Once the piece has hardened, check for a consistent glossy finish. If you’re satisfied with the outcome, you can remove it from the wire hanger. However, if you plan to paint the piece, keeping it on the hanger can be useful for holding and suspending during painting.
Finishing Options:
| Types | Methods |
| Satisfactory finish | You can either leave it as it is or sand it for a smoother matte finish. |
| Any surface imperfections | Consider filing or sanding them down, and you can repeat the smoothing process if needed. |
| Painting in plans | Move on to priming and painting. |
Addressing Hanger Holes:
| Types | Methods |
| Small holes (easy to clean up) | Ideally located in less visible areas. |
| Painting | Fill the hole with spot filler, sand it until smooth, and then continue with painting. |
Brief Guide to Safety Precautions During the ABS Acetone Smoothing Process
Though ABS acetone smoothing is effective, when working with acetone for smoothing ABS parts, safety should come first. Here’s a short guide with key precautions to protect yourself and your workspace.
Work in a Well-Ventilated Area
Since acetone is easy to be flammable and volatile, ensure the area is open and airy enough to avoid inhaling harmful acetone fumes. Otherwise, this could potentially lead to health hazards.
Put on Protective Gear
Make sure to wear gloves and goggles before opening the acetone bottle and pouring it onto the paper towels. Chemical-resistant gloves are used to prevent skin contact and goggles are used to protect your eyes from accidental splashes.
Choose a Quality ABS Print
Invest in a top-notch ABS filament. Cheaper options might contain additives from other plastics that don’t react well with acetone. To protect your work and achieve great results, select ABS filaments from trusted brands.
Keep Away from Electrical Outlets & Open Flames
Acetone is highly flammable, so make sure there are no electrical outlets, open flames or heat sources during the smoothing process.
Dispose of Materials Responsibly
For acetone-soaked materials, place them in a metal container lined with a plastic garbage bag and then discard them with regular trash, ensuring they are not left lying around where they could pose a fire hazard. Take liquid acetone to a facility that handles hazardous waste for treatment, storage, disposal, or recycling.
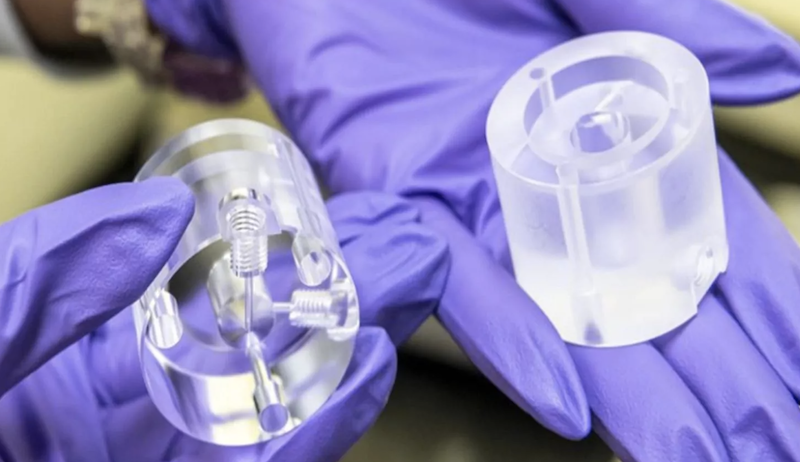
Best ABS Acetone Smoothing Service Provider – TEAM Rapid Tooling
Whether CNC rapid prototyping or low-volume production, it aims to achieve quality standards. Vapor polishing is used in post-production to ensure that your 3D-printed ABS products comply with these standards. TEAM Rapid Tooling firmly recognizes this point and is dedicated to bringing your prototyping ideas to life.
Superior Quality Finish
TEAM Rapid Tooling delivers a smooth and glossy finish on ABS prints, enhancing aesthetic appeal and making them ideal for presentation and display purposes.
Increased Efficiency
TEAM Rapid Tooling’s advanced vapor polishing techniques ensure a quick turnaround time with rapid tooling services, allowing you to meet strict deadlines and accelerate your projects without compromising on the superior quality of results.
Expertise in ABS Polishing
With extensive experience and specialized knowledge in vapor polishing, TEAM Rapid Tooling can easily handle complex designs and intricate details of each ABS print for precise finishes.
Exceptional Customer Satisfaction
TEAM Rapid Tooling is committed to delivering outstanding service with flexible customized options, consistently going above and beyond to meet customer expectations.
Environmental-friendly Practices
TEAM Rapid Tooling employs eco-friendly methods in the vapor polishing process, reducing ecological impact and promoting sustainability without sacrificing quality.
Competitive Pricing
TEAM Rapid Tooling combines affordability with top-tier results. It offers unparalleled precision and reliability in its vapor polishing services at cost-effective prices.
Tips for ABS Acetone Smoothing
Here are some useful tips for achieving the best results when using acetone to smooth ABS:
Achieve Consistent Results
To achieve consistent results in ABS acetone smoothing, monitor the process closely to avoid over-smoothing. This is because overexposure to acetone may result in over-smoothing and the loss of intricate details. Regularly evaluating your print’s progress is essential to achieving the desired result. Furthermore, experiment with acetone amounts, using methods like brushing or vapor baths for even distribution. This helps to discover the optimal balance for your project.
Adjust the Process to Accommodate Various Part Sizes and Geometries
While the fundamental principles of acetone smoothing are consistent, modifying your approach can greatly influence the results. For smaller parts with complex details, it’s best to use less acetone and shorter exposure times, as they smooth quickly due to their limited surface area. Instead, larger parts might need more acetone and longer exposure to ensure even smoothing.
Additionally, the orientation of your 3D print influences the process, with vertical surfaces smoothing more quickly than horizontal ones. Conducting experiments and test prints can assist in determining the optimal settings for various sizes and geometries.
Alternatives to ABS Acetone Smoothing
Acetone smoothing is very effective, but if you need a method that avoids chemicals, consider these alternatives:
Sanding
Sanding comes as one of the most common non-chemical techniques for smoothing 3D printed parts. It involves manually using sandpaper to gradually remove material from the surface. Start with coarse sandpaper, such as 80-grit, and gradually progress to finer grits like 120 and 240. For a smoother finish, use very fine-grit sandpaper (around 1000) with water. Ensure you cover the entire surface evenly. Time permitting, manual sanding is advisable. Although sanding is safe and simple, reaching deep crevices and maintaining consistent pressure can be challenging.
Polishing
To achieve a glossy finish on your ABS parts without using a strong solvent like acetone, you can use liquid polish and a cloth. This should be applied after sanding, once the surface is fairly smooth. Use a cloth soaked in polish and apply firm circular motions until the part reaches a high gloss.
Conclusion
Acetone smoothing is an invaluable technique for 3D printing enthusiasts looking to elevate the quality of their ABS prints. With this comprehensive guide, you can achieve a polished and professional finish that enhances both the appearance and durability of your creations. This detailed guide enables you to attain a polished and professional finish, improving both the look and durability of your creations. Reach out to us at [email protected] today to discuss your vapor polishing and rapid manufacturing requirements.